Tuesday 31 January 2006

leeks

I work in a great, if interesting at times, part of town. I am within five minutes of the best food shop - Moore Wilson's , just up the road from the most fantastic butcher - Meat, and round the corner from Common Sense Organics.
Common Sense Organics is a wonderful place to browse when you pop out at lunchtime to buy your dinner. Not all the products sold are organic but they all have a responsible provenance.
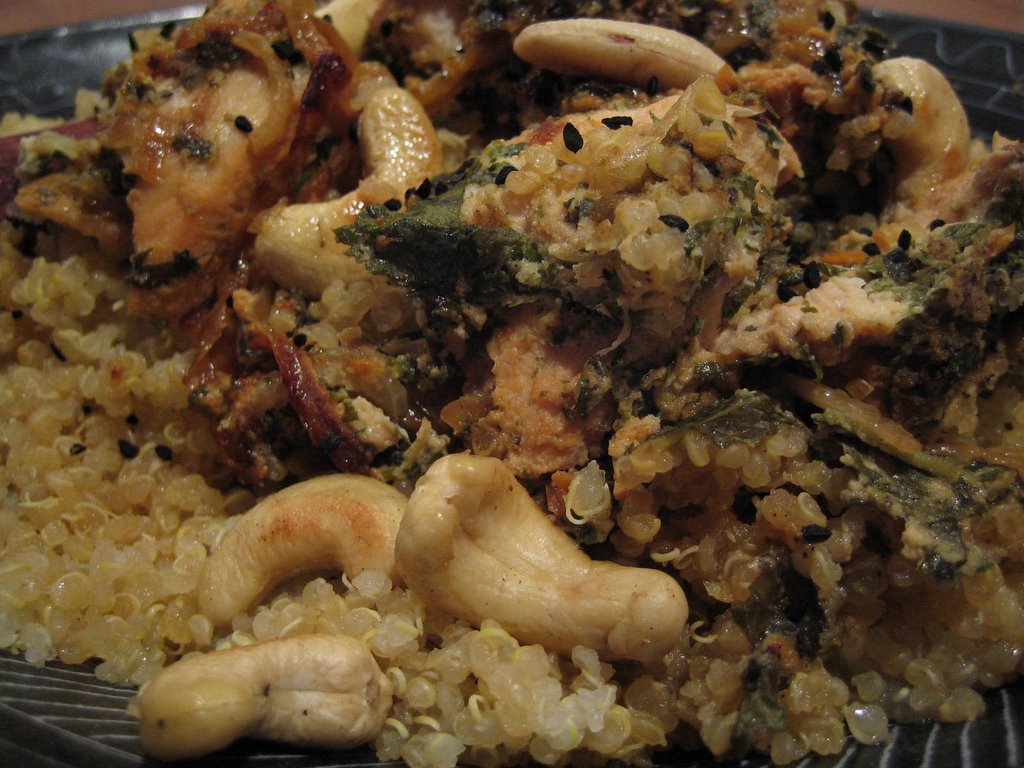
Today we agreed that we needed some iron for dinner so I bought a thick slice of aged sirloin from Meat then carried on round the corner to Common Sense Organics to choose some vegetables to accompany the steak.
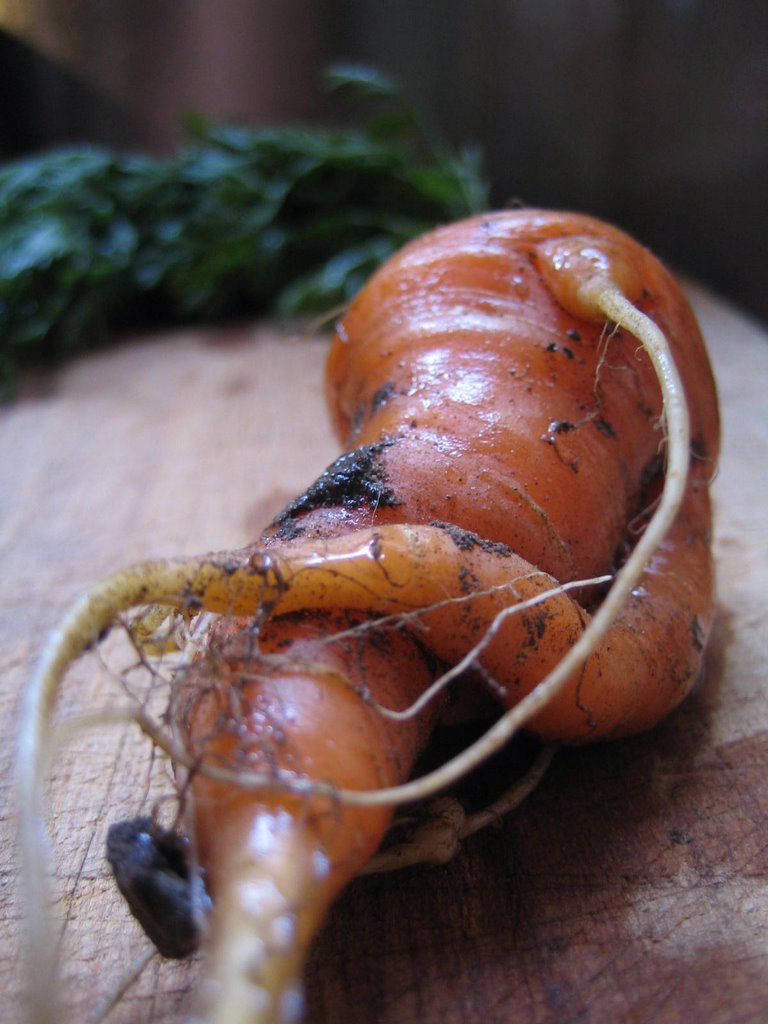
The best thing about this shop is that instead of bags of anonymous potatoes labelled "all-purpose" you can choose from a vast and dirty selection of loose potatoes such as Old Blue and Agria or peruse the numerous types of plums that look like they were just picked from the tree.
And this is the place to buy your bulk goods like quinoa, jumbo oats and stone-ground unbleached flour.
I just had to buy some baby leeks and tiny new carrots for dinner, a couple of wrinkly passion fruit for after as well as a ginormous radish to eat before my lunch. Oh and some parsley plants to put in my new garden.
I was back at work within 15 minutes with a fantastic dinner just waiting to be cooked.

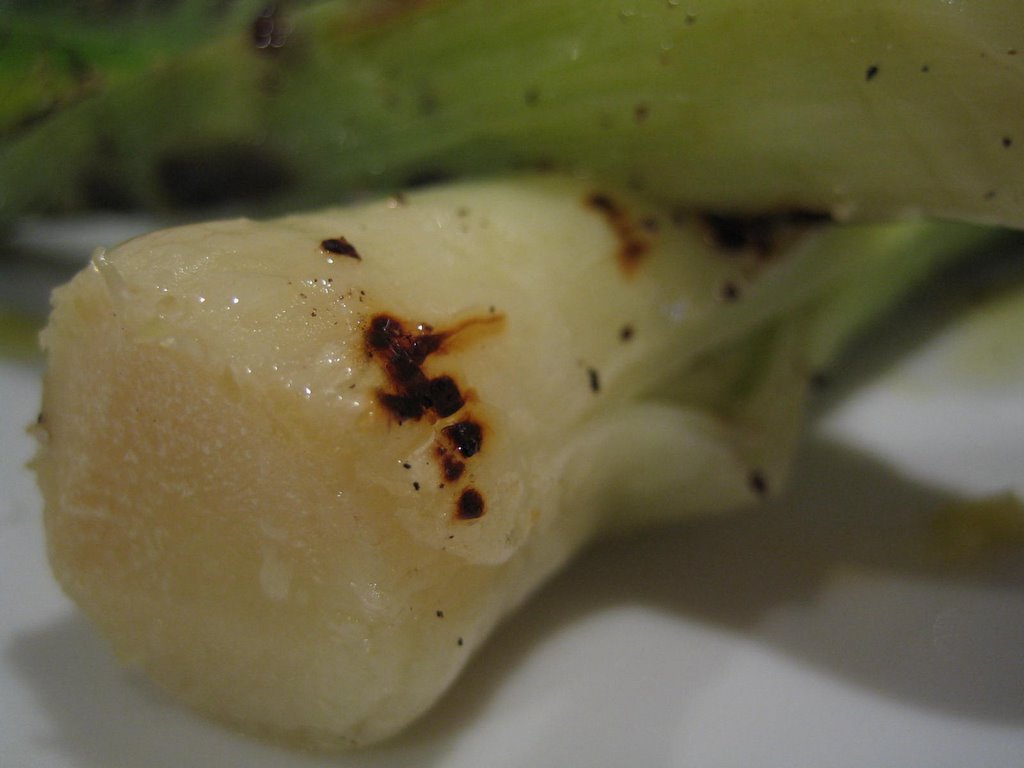
I cooked the leeks like this :

Cut the root off the leeks but leave the bit that joins the layers together. Trim the tops to a length that looks nice without any dry looking green bits. Cut the leeks lengthwise an inch from the root end, keeping the leeks in one piece with the root. Soak in cold water until you think the dirt has dissolved away.
Steam the leeks for five minutes or until tender. Dry on a tea towel, then spray with olive oil and sprinkle with salt and pepper. Cook briefly on a hot griddle - ideally while the steak you are also eating rests - until slightly charred in places and begging to be eaten.

Sunday 29 January 2006

lap·par·delle

I wanted to come up with something new for Use Your as hosted by Amy, but I am not sure that I have. Lappardelle or rabbit stew with pappardelle is not really anything new ; noodles are a traditional base on which to serve a stew and rabbit stew is a great way to prepare rabbit. Well maybe the name is new?

For four of us, anticipating being hungy at the end of a day at the races I made lappardelle :

Noodles :
200g of durum wheat
a pinch of salt
2 eggs

Stew :
2 onions, sliced
2 cloves of garlic, sliced
4 slices of leg ham, cut into strips
1 rabbit, cut into pieces
2 bay leaves
6 juniper berries, lightly crushed
1 tablespoon of flour
750mL of dry cider

In the morning I fried the onions and garlic in a bit of butter until all was slightly golden, adding the ham once the onions were starting to turn. While the onions were frying I made the noodle dough, wrapped it, and put it in the fridge to rest.
Once the onions were soft and golden I removed them to the crock-pot. I put a wee bit more butter in the frying pan, turned up the heat and fried the rabbit pieces briefly on each side until golden, seasoning with salt and pepper as I went, then added them to the crockpot.
I made a light roux in the frying pan with the flour and the remaining butter, pouring in a bit of the cider to help it out of the frying pan and into the crock-pot.
Tuck the bay leaves and juniper berries in the crock-pot and pour over the rest of the cider.
Set the crock-pot to Auto and head off to the races.
When you have returned, perhaps a bit poorer than when you set off, check the seasoning of the stew and put a large pot of water on to boil for the noodles. Roll out the noodle dough as thin as you can and cut into thick ribbons laying them out on a tea towel as you go to dry slightly. When the water is at a rolling boil salt it then drop in the noodles. They will not take long to cook so keep your eye on them. Drain them well tossing the colander to release any trapped water, then add a knob of butter to lubricate the noodles just a bit.
Serve the stew on top of the noodles.
Put a bone-bowl on the table and warn people the rabbit has bones in it.

Enjoy your bunny!

Friday 27 January 2006

sum·mer pud·ding

Summer pudding is a traditional English dessert. We used to have it so many times all through summer, probably to use up the berries we had picked from the hedgerows. Both of those points almost certainly explain why I haven't eaten it for years and have never made it myself. But for some reason it came to mind as the perfect dish for Sugar High Friday which for this month is as hosted by Sam of Becks & Posh.

Summer pudding is like a big round fresh delicious jam sandwich. A bread shell encasing a berry filling. It is a simple dish made of two primary ingredients - berries and bread - and like any dish so simple attention needs to be paid to the selection of these ingredients.

It is also a healthy pudding. There is no rich or stodgy pastry or creamy heavy fillings.

The berries are best to be sweet and ripe and juicy. Before they are committed to their bread-y cave they need to be tested for deliciousness - would you eat these berries as they are? At a push good frozen berries could be used.

The bread needs to be sturdy but not too dense. And white. This is not the place for whole-meal or whole-grain. A home-made white loaf is perfect. It needs to absorb the juice but not fall apart.

I make summer pudding like this :

Choose the basin or bowl in which you are going to make the pudding. A traditional shaped pudding basin is good. Since I didn't want to make too much I used a deep cereal bowl.
Put aside to become day-old as many generous slices of bread as you estimate it will take to fully line and top the basin, plus one slice.
Select a mixture of berries, the traditional mix is raspberries and redcurrants, but blackcurrants are often included. I used raspberries, blackcurrants and boysenberries. You need more than will fit in the basin. Be generous, they will not go to waste!
If your berries taste as if they could use some sugar then sprinkle them with as much as necessary - possibly not any (especially when low sugar is the name of the game!). Leave the berries overnight to macerate. This is not necessary if no sugar has been added.
When you are ready to form the pudding, tip the berries into a pot with a tablespoon of water and bring to the boil and simmer for a minute or until the berries start to burst and the juice begins to run. Remove from the heat.
Cut the crusts from the bread slices. Cut a circle from one slice of bread for the bottom of the basin and use the other slices to firmly line the sides. Push the slices together firmly, patching any gaps so the fruit will not escape.
Pour half the berries and juice into the basin, add a slice of bread, and then the rest of the berries and juice. Save any juice that will not fit to pour over any non-sodden bits of bread at the end. Finish with a bread lid.
Put a flat plate or saucer and a weight on top and put in the fridge overnight, or for up to two days. Cover the basin with plastic wrap under the weight if you like.
When it is time to serve the pudding, slide a flat knife carefully around the basin and turn out onto a plate. Pour the reserved juices on any bits of bread that are still white. Serve in slices with cream, or yoghurt, if you like - but I like it plain. For such a simple and healthy pudding it is fairly rich!

Wednesday 25 January 2006

choc·o·late chip cash·ew cook·ie

Chocolate chip cookies are the quintessential biscuit. Something with which I have never before dared tinker. But for some reason today I decided to add some cashew nuts ; I admit that is hardly a ground breaking variation. I will also admit that the only reason I did so is that I am going through a phase of wanting to use everything up and empty the bulging cupboards and fridge just a bit. A reaction to the excesses of Christmas and New Year. A familiar theme to me at the end of January. And what better way to recover from an period of excess than with a large plate of chocolate chop cashew cookies. Ironically perhaps.

To make at least two dozen normal sized cookies :

115g butter
1/2 cup of light muscovado sugar
1/3 cup of caster sugar
1 egg
1/2 teaspoon of natural vanilla essence
1 cup flour
1/2 teaspoon of bicarbonate of soda
1/2 teaspoon of salt
1 cup dark chocolate chopped into chunks
1/2 cup cashew nuts chopped coarsely

Preheat the oven to
160°c.
Cream the butter and sugar until pale and fluffy. Beat in the egg and vanilla, but not too much so that it doesn't curdle. Fold in the dry ingredients and then the chocolate and cashew nuts.
Drop spoonfuls of the mixture onto a baking sheet lined with baking paper and bake for 8 to 10 minutes or until they are golden and look ready. I always make a couple of ginormous ones for the sheer excitement!

Sunday 22 January 2006

gridd·led veg·e·table and ha·lou·mi sta·ck

Haloumi is a firm Cypriot style cheese with the fine ability to not melt when it is heated. Well, actually, if you leave it for too long on the BBQ or in the pan it will melt, sadly. A perfectly prepared piece of haloumi is warmed through, with a crispy crust, and still firm in the middle. Raw haloumi squeaks between your teeth when it is chewed, which I quite like. I think some people for this reason call it squeaky cheese.
I buy haloumi with the intention of trying it in a new way, perhaps grated into patties with courgette or included in a spinach pie with, or instead of, ricotta. But I always end up doing the same thing everytime because I love it so much.
Griddled Vegetable and Haloumi Stack

Slice a selection of griddling vegetables : aubergine, tomatoes, courgettes, mushrooms etc
Slice the Haloumi into pieces about 1 to 2 centimeters thick.
Prepare an olive oil bath flavoured with garlic, salt and pepper.
Heat your BBQ or griddle to medium high.
Dip the vegetables briefly into the oil bath to lightly coat the cut sides and place on the BBQ or griddle.
Cook the vegetables until soft and nicely branded.
If your griddle isn't large enough to hold all the vegetables (mine isn't), keep warm, and perhaps continue to cook, in a low oven in a dish.
When all the vegetables are cooked, dip the haloumi in the oil and griddle or BBQ on bothsides to form a lovely golden crust, but not to melt away.
Stack the vegetables and haloumi in a fetching manner, pouring over any vegetable juices that have collected.
If you want a more substantial dish, boiled new potatoes or sliced boiled and griddled kumara and perhaps some wilted spinach go really well.

Wednesday 18 January 2006

rav·i·o·li

Ok, so I had fun making these!

I had some choritzo mix left over and had made some pasta dough for fettuccine so I thought I would make ravioli. And since pigs were on my mind I decided to make pig shaped (well, they could be pigs, sheep or pug dogs) ravioli. Totally amused me, it was like putting the guts back in!

This is what I did :

Make some pasta dough using a ratio of 100g of durum wheat flour to 1 egg and a pinch of salt. Leave to rest for 1 hour in the fridge. Roll out as thinly as possible, or to the smallest setting on a pasta machine.
Lay the pasta on a floured surface. Allow more for the cover layer than you have for the bottom. Make some sausage shapes with the filling and lay out on the pasta, ensuring these will fit inside the cutter you choose with room to seal.
Paint the pasta with lightly beaten egg white so the cover layer will stick.
Cover with another layer of pasta, pressing out any air and pressing the two layers together.
Cut into your chosen shape.

Leave to dry on a floured tea towel while you make the sauce.

Since the choritzo filling is spicy I thought a slightly spicy tomato sauce would go well :

Simmer a can of whole peeled tomatoes with some garlic, dried chilli, oregano and thyme until it is thick and the excess water has evaporated. Push through a sieve and discard the herb stems, chilli carcass and tomato seeds. Season with salt and pepper and reheat.

Cook the ravioli in lots of salted boiling water until they float to the top and look cooked.

Serve :
Looking at this now I think it definately is dog shaped - Dog-shaped Durum-wheat dough - Perfect for Slashfood's D-Day!

Monday 16 January 2006

beef stro·ga·noff

Beef stroganoff, for me, is a nostalgic dish. I am not sure why. I remember wanting to make it when I was first flatting at university because it was a nostalgic food. But I do not remember having it before then, so goodness knows what was going on there. At Uni I used to make it using the cheapest cut of beef at the supermarket, a Maggi packet mix and a tub of sour cream - I, and the flat, loved it!

I have not made stroganoff without a packet mix before but I thought it worth a go. It was, delicious :

Cut some rump steak into thin strips and toss in seasoned flour. Fry in olive oil in a heavy frying pan until browned, in batches if necessary. Remove to a plate.
Fry a thinly sliced onion and garlic until soft. Add some finely sliced mushrooms and cook until soft. Stir in some tomato paste and yoghurt [sour cream is traditional choice, but I use yoghurt for everything since I always have it on hand] to make a good looking sauce. Return the steak to the pan and heat through. Season with salt and pepper. Serve with buttered fettuccine sprinkled with finely chopped parsley.

Saturday 14 January 2006

sau·sages

In honour of San Antonio Abate's feast day on January 17th Savoring the whole hog is holding Some Pig Blogging Weekend. I love the idea of this event. Blessing the pig. Such a good idea.

I thought I would make some pork sausages. Two kinds of pork sausages. Choritzo and Breakfast Sausages.

I bought my pork from Meat on Tory in Wellington. The pork at Meat is from Murrellen Pork in the South Island. The people at Murellen treat their pigs decently which, as their site states, proves the adage "a happy pig produces good pork". This pork is significantly nicer - nicer looking, nicer feeling and nicer tasting - than the sad standard mass produced pork so easily found on supermarket shelves.

I asked the butcher for belly meat and back fat in the ratio of about 2:1. And this is how I made the sausages :

Mince the meat and fat through the course screen of a mincer, or chop it well by hand.
Keep the meat and fat cold through out the process by resting it in the fridge or freezer at strategic points.
Put the mince into a bowl and add the flavourings mixing well, but not so well that the fat goes mushy.

These were the flavourings I used :

Choritzo :
Bittersweet smoked paprika
Hot smoked paprika
Garlic
Fresh scotch bonnet chilli
Dried red chilli
Salt
Pepper
Chilli sherry
Cumin

Breakfast Sausage :
Fresh sage
Salt
Pepper

I haven't been specific about the amounts because it all depends on your taste. The best way to test if it is to your taste is to fry a small amount and taste it.

Once you are happy with the mixture you can fill some sausage skins* or put it into a dish to be made into patties later. The mixture now needs to be rested for a day to let the flavours mingle before you bbq, fry or grill them.

* I used cellulose skins because that is what the butcher had to give me. They were easy to handle and did not require and presoaking. As much as I am looking forward to using proper sausage casings I imagine they will be a little more tricky than these cellulose ones.

Friday 13 January 2006

ap·ple pie

If you wish to make an apple pie from scratch, you must first create the universe.
Carl Sagan


How easy is it to make apple pie?
Very easy!
It makes you look like you are a complete whiz in the kitchen.
And makes the kitchen smell absolutely wonderful.

Apple pie makes people happy. So many people have good memories of apple pie, some due to books and movies as well as Grandmothers and Aunties. There are many, many ways to make an apple pie, some more demanding than others, and there is a time and place in which it is appropriate to choose the harder route. But generally, as far as apple pie is concerned, I tend to choose the easy option!

This is how I make Apple pie in nine easy steps :
  1. Slice peeled and cored apples into a pie plate.
  2. Tuck in cinnamon quills or cloves.
  3. Sprinkle over some sugar to your taste.
  4. Cover with puff pastry.
  5. Decorate to make it look even prettier.
  6. Chill for 30 minutes.
  7. Brush with beaten egg or milk.
  8. Cook at 180°c for 25 minutes.
  9. Eat with cream.
Enjoy and don't forget a cold slice makes a great breakfast!

Tuesday 10 January 2006

pain à l'ancienne

Pain à l'ancienne is not actually a type of bread, but rather a technique for making bread. The technique uses delayed-fermentation. Delayed-fermentation means that you make the dough then delay the fermentation by retarding the action of the yeast by chilling the dough. Ice water is used to mix the dough and then the fridge is used to hold the dough overnight. It is an easy method producing a deliciously different tasting result.

I think that you could use the pain à l'ancienne method with any bread recipe, but I have not yet tested this theory.

The recipe I used is from the book The Bread Baker's Apprentice which I can highly recommend for all aspects of bread baking - recipes, explanations and techniques.

I made three pain à l'ancienne baguettes like this :

Make a dough from 3 cups of stone-ground unbleached flour, 1 teaspoon of salt, 1 teaspoon of dried yeast, and just over 1 cup of ice cold water. Add more water as you go if required to make a very soft almost sticky dough. Transfer to a lightly oiled bowl, cover with plastic wrap and put in the fridge overnight, or the equivalent.

Take the bowl out of the fridge and leave at room temperature until it has doubled in size from the size it was when it went into the fridge.

Gently transfer the dough to a generously floured bench, trying not to deflate the dough. Carefully shape the dough into a rectangle. Flour your hands and the bench as necessary. Cut the dough lengthwise into three, being careful not to degas the dough. Leave the dough to rest for 5 minutes.

Heat the oven to as hot as possible (250°c), putting a baking stone in if possible and a metal container for steam.

Put the dough on baking paper or a Teflon sheet and shape the pieces of dough into baguettes by gently stretching them the length of the baking sheet or stone. Slash each baguette with an extremely sharp knife or razor blade. Put in the oven, adding water to the steam receptacle. Turn the oven down to 225°c and bake for 10 minutes or until the loaves look good and sound hollow when rapped on their bottoms.

Leave to rest for at least 20 minutes. This part is the hardest but it is very important because this is considered the final stage of the baking. The structure is still changing, the flavour is still developing.

Slice or break and enjoy the different, more nutty flavour of the bread produced by the pain à l'ancienne method. It is wonderful with some freshly made butter.

Monday 9 January 2006

bi·ry·a·ni


#14, as hosted by Belly-Timber and thanks to Tomatilla, has finally allowed me to play out my Ready-Steady-Cook ambitions! I have been dreaming of this moment.

For $10 I bought, as per instructions :

  • Quinoa - $1.35
  • Cashew Nuts - $5.10
  • Yoghurt - from the fridge
  • Black Cumin Babies - from the cupboard
So I pocketed $3.55 and got cooking, only raiding my stocks of herbs, spices and pillaging a chicken breast from the freezer.

Baby Biryani

1/2 an onion, sliced
1 chicken breast, cut into large chunks
1/2 cup yoghurt
1/2 cup of chopped coriander leaves
2 teaspoons of grated ginger
2 teaspoons of minced garlic
1 finely minced chilli
1/4 teaspoon of salt
mint leaves
1 teaspoon garam masala
1/2 cup quinoa
1/2 cup milk warmed with a pinch of saffron to infuse
1/2 a lemon, juiced
toasted cashew nuts and black cumin babies to serve

Fry the onion until golden.
Mix the yoghurt with the coriander leaves, ginger, garlic, salt, chilli and fried onion. Add the chicken and leave to marinate in the fridge for at least two hours or overnight.
Rinse half a cup of quinoa in lots of water until the water runs clear.
Cook the quinoa in boiling water to which you have added salt, a length of cinnamon, a few cloves and some cardamom pods, for 10 minutes until almost cooked. Drain and spread out on a plate to let the steam escape.
Coat the bottom of a heavy bottomed pot with a good lid with some oil. Tip in the chicken and yoghurt mixture. Sprinkle with garam masala and the torn mint leaves. Top with the quinoa, spices and all. Make holes to the bottom of the pot with a knife and pour over the saffron infused milk and lemon juice.
Put the lid on the pot and put on high heat for 10 minutes then turn to low for another 10.
Tip out onto a serving plate and sprinkle with the cashew nuts and the cumin babies.

Eat with your fingers as is the custom!

This was a modified version of a chicken biryani recipe given to me by some friends from Hyderabad, the home of biryani. The original uses a whole chicken cut in pieces and, of course, rice. I have made a few adjustments over time such as leaving out the food colouring, using fresh minced chilli instead of chilli powder and using the spices I fancy at the time instead of garam masala. This has been my first time cooking, or eating, quinoa and I must say I am very pleased with the results!

The black cumin babies are of course black cumin seeds. Seeds being "A ripened plant ovule containing an embryo" - sounds like a baby to me!

Sunday 8 January 2006

but·ter

Mmmmmmmm butter.

Butter on freshly baked bread, still warm from the oven. Fresh butter. It is all good!

Butter is good for you. Primarily because it is a natural product free of bad things like trans-fats. I think this article presents it very well.

I remember an advert with a little girl saying to her mother "Mummy how do you make butter?" Her mother replied "From cream". Then the little girl says "Mummy how do you make margarine?" And her mother replies "Ask your father, he's the chemist". Brilliant, I think, summing it up perfectly.

Sometimes when I am in the mood I make butter just to remind myself how easy it is and how nice the end product is. This article from Cooking For Engineers on making butter explains things very well.

This is how I do it :

Whip some cream as you would for whipped cream. Keep going until it turns yellow and a milky liquid is released. This is buttermilk so keep it when you tip it off. Add some fresh cold water and gently wash the butter, squeezing with your hands. Pour off the liquid (discarding this time) and repeat until the liquid is pretty much clear. Washing away the buttermilk will improve the storage time of the butter. Drain the butter from the liquid as best as you can then add some salt to taste if you want salted butter. Spread some on fresh bread, marvelling at the taste, then store the rest in the fridge.

Friday 6 January 2006

birch·er mues·li

At this time of year, the time of year for making resolutions about being more healthy, having a good breakfast is a good thing to do.

Bircher muesli differs from other muesli because it is soaked in a liquid overnight. Some people soak their bircher in cream which gives the most rich and wonderful result ; but not quite what we are looking for here. We soak our bircher in water. The overnight soaking softens the seeds and grains making them more digestible and the nutrients with more accessible.

The possible ingredients for bircher muesli are almost infinite. I have a basic blend to which I add any suitable items I have on hand.

But the muesli is only the beginning! It is the complete dish which is most amazing. We add raisins to the soaking mixture and yoghurt and fruit before eating.

Fibre, trace elements, protein, essential fatty acids, vitamins are only a few of the good things to be gained from a bowl of bircher muesli.

And it is cheap. I buy the amount of each ingredient I need from the bulk bins at the local organic shop.

My basic blend is :

1 cup steel cut rolled oats
1 cup jumbo rolled oats
1 cup barley flakes
1/2 cup buckwheat groats
1/2 cup sunflower seeds
1/2 cup linseed

I often add rye flakes, millet flakes, oat bran, wheat bran, sesame seeds, pumpkin seeds.

To prepare - soak a measure of the dry mixture in an equal volume of water overnight, add raisins or other dried fruits as you like.

To serve - add some yoghurt, raw or stewed fruit and some nuts if you fancy them.

A brilliant breakfast, quick to prepare, you can even put everything in the night before. Easy to transport in a container with a tight fitting lid if you need to rush off to work and have breakfast there . . .

Thursday 5 January 2006

car·rot

Oranges are not the only fruit.
Fruits are not the only orange.
All fruits are not orange.
All orange are not fruit.

Foodography thanks to SpittoonExtra and Becks and Posh which can be viewed on Flickr.

This carrot was one of a mob pulled from my mother's garden, plunged into boiled water, doused in butter and enjoyed - all within about thirty minutes. So sweet, yet still crunchy. The best way to have carrots and celebrate summer, fresh vegetables and the New Year!

Wednesday 4 January 2006

gar·lic

It was such a lovely surprise to find fresh garlic at the supermarket. Fresh garlic with soft skins. And green tops. A lovely fresh taste.

I dread running out of garlic. If you have to do without it in a recipe it always seems obvious that there is something missing. And there is so much that can be done with garlic
If it is finely sliced and added to a stir fry it disappears into the general deliciousness.
If it is minced with a garlic press and blended with butter, salt and pepper and maybe some parsley, it makes fantastic garlic bread.
If it is slow roasted, and squeezed out of the papery casings, it is the perfect accompaniment for roast meat. Or wonderful spread on bread. Or fantastic added to a sauce, any sauce.

I roast garlic like this :

Take several whole heads of garlic. Cut horizontally just through the top of the cloves. Drizzle with olive oil, sprinkle with salt and pepper and wrap into baggy foil parcels.
Bake at 180°c, 160°c or whatever the oven is at [within reason] for about an hour or until soft.

Monday 2 January 2006

pi·not noir


I was so happy to see that the seventeeth round of Wine Blogging Wednesday as hosted by The Corkdork is to feature New Zealand Red Wine - I knew exactly why we had been saving a bottle of Daniel Schuster Omihi Hills Vineyard Selection 2002.

"Omihi Hills Vineyard selection represents the finest pinot noir grapes harvested from selected plots from within our Omihi Hills Vineyard in Waipara."

We actually won this bottle at a blending class hosted by the weird and wonderful Rumble and Daniel Schuster himself. The 2004 vinyard selection blend was about to be bottled and Daniel had brought some of the raw components to Wellington for the class. The idea of the class was for us lucky folk to try the individual parts that are blended together to produce a well rounded wine ; in part so we could try the "depth", "nose" and "body" without the support of the complete wine but also to illustrate the art of blending.

All the parts were from the Pinot grape, but had been grown in different plots of the vineyard and as such demonstrated very different characteristics. It was amazing to have Daniel describe the land in which the vine was grown just from tasting the wine. Just by adding a splash more of one wine to the blend we were able to produce a different tasting blend. I can't help but say that this was very much like cooking ; a dash more of this, and spot more of that and the whole dish can change.

This wine was an amazing change from the run of the mill Pinots I had tried up until then. It was delicious, fruity and fairly light as I remember in 2004 when we first tried this vintage. At the time we were told that it would age well, so now at the beginning of 2006, almost four years later, we can find out . .

It is wonderful! Much browner in colour, but still ruby red. It smells less floral than I remember. Cherries and almonds come to mind. To me it tastes substantial - big and lasting. It leaves a fantastic taste in the mouth, but it is still light.

Just perfect for 3:20 on a sunny Monday afternoon, going remarkably well with apple and walnut cake.

Sunday 1 January 2006

steak pie

Steak pie is a New Year's day tradition in our family. Greig remembers always having a steak pie on New Years day when he was growing up in Scotland. Steak pie is eaten on New Year's day because it was a special treat, could be prepared ahead of time and was good winter food. But I really can't think of a more restorative meal for the day after New Year's Eve - summer or not.

I make steak pie like this :
Lightly toss 1 inch cubes of beef in seasoned flour. I use silverside (uncorned) because it will stay in chunks and not fall apart with long cooking. Brown in batches in a mixture of olive oil and butter, taking care not to over crowd the pan and therefore start stewing the pieces. We want nice brown crust at this stage! Remove to a plate as each batch is done. I use a Le Creuset French Ovenso I can do the browning and the stewing in the one pot.
Lightly fry a thinly sliced onion then return the meat to the pan. Pour over some liquid, I use beer, home brew Chocolate Stout to be specific, because it seems like the right thing to do. Cover the pan and put it in the oven to cook gently for several hours* until it is tender, cooked, and delicious. If it seems necessary to reduce the gravy then remove the meat and boil the liquid until it is the right consistency. Adjust the seasoning and allow the meat to cool in the liquid. Refrigerate until you are ready to make the pie.
On New Year's day, put the meat and some of the gravy into a pie dish, roll out pastry to cover the dish, making sure you cut a little hole or include a pie vent to let the steam escape.
Decorate the pie as you like then put in the fridge to rest for at least thirty minutes. Preheat the oven to 180°c. Brush the pie with beaten egg or milk and cook for 25 minutes or until it looks golden and ready.
We serve steak pie with boiled new potatoes, peas and the extra gravy.
What a fabulous way to start the New Year!

* I received On Food and Cooking: The Science and Lore of the Kitchen by Harold McGee for Christmas, so this year I decided to follow the instructions for tender stewed meat. I cooked the pie filling for 2 hours at 95°c then for another 2 hours at 120°c. I think it worked!